きままな日常、思いつき、毒舌、言いたい放題・・・PCネタ、ガンダムネタが楽しいです。
テストマネジメントツールSquashTMを入れて見る その1 [コンピュータ]
会社の人が、ソフトウエアテストシンポジウム「JaSST'17 Tokyo」に行ってきて、
http://jasst.jp/symposium/jasst17tokyo/details.html
「テストマネジメントツールSquashTMを利用した継続的テスト改善 」がなかなか良かったらしく、
お試しで使ってみようという話になり入れてみました。
SquashTM
http://www.squashtest.org/fr/decouvrir-squash-tm/contenu-statique/outils-et-fonctionnalites/squash-tm-test-management
提供元が、フランスなのか、フランス語か英語しかない。
困った時のGoogleさん
ChromeでWebページを表示させたらとりあえず翻訳。
Win、Linuxなどいろいろな環境で動くようだけど、ほどよいサーバーがないので、
PCで試してみる。
Win10のHyper-V上にCentos7.0を入れて、Apahce、MariaDB、PHP環境を作るところから。
■やったことのメモ
#念のためこの通りやって動く保証はしません!
SELinux無効
vi /etc/sysconfig/selinux #自分はEMACSは使えない人なので、viで
SELINUX=enforcing
↓
SELINUX=disabled
再起動
shutdown -r now
Apacheもろもろインストール
yum -y install httpd httpd-devel
Apacheスタート・自動起動
systemctl start httpd
systemctl enable httpd
ファイアウォールを通れるようにする
firewall-cmd --permanent --zone=public --add-service=http
firewall-cmd --permanent --zone=public --add-service=https
firewall-cmd --reload
PHPインストール
yum -y install php php-mbstring php-pear
iniファイルを変更して、タイムゾーンとかもろもろ必要ことを書く、コメントアウト外したり
vi /etc/php.ini
-----------------
date.timezone = "Asia/Tokyo"
~中略~
mbsting.language = Japanese
mbstring.internal_encoding = UTF-8
mbstring.http_input = UTF-8
mbstring.http_output = pass
mbstring.encoding_translation = On
mbstring.detect_order = auto
mbstring.substitute_charset = none
-----------------
MariaDBインストール
yum -y install mariadb-server
MariaDB スタート・自動起動
service mariadb start
systemctl enable mariadb
MariaDBの設定その1
vi /etc/my.cnf
-----------------
[mysqld]
datadir=/var/lib/mysql
socket=/var/lib/mysql/mysql.sock
# Disabling symbolic-links is recommended to prevent assorted security risks
symbolic-links=0
# Settings user and group are ignored when systemd is used.
# If you need to run mysqld under a different user or group, # customize your systemd unit file for mariadb according to the # instructions in http://fedoraproject.org/wiki/Systemd
character-set-server=utf8 ←追加
[mysqld_safe]
log-error=/var/log/mariadb/mariadb.log
pid-file=/var/run/mariadb/mariadb.pid
#
# include all files from the config directory # !includedir /etc/my.cnf.d
[mysql] ←追加
default-character-set=utf8 ←追加
-----------------
MariaDBの設定その2
mysql -u root -p
MariaDB [(none)]> use mysql;
rootのパスワード設定
MariaDB [mysql]> update user set password=password('任意のぱすーわど') where user = 'root';
MariaDB [mysql]> delete from user where user = '';
MariaDB [mysql]> exit;
phpMyAdmin インストール
yum --enablerepo=epel -y install phpMyAdmin php-mysql php-mcrypt
phpMyAdmin にリモートから接続できようにする
※セキュリティが気になる人はやらないように
vi /etc/httpd/conf.d/phpMyAdmin.conf
---------------------
Directory /usr/share/phpMyAdmin/
と
Directory /usr/share/phpMyAdmin/setup/
Apache 2.4のところコメントアウトと追加
# Require ip 127.0.0.1
# Require ip ::1
Require all granted ←追加
---------------------
ここまでが下準備
ここからやっと
SquashTMのインストール
インストール手順はここ↓参照
https://sites.google.com/a/henix.fr/wiki-squash-tm/installation-and-exploitation-guide/2---installation-of-squash-tm/3---redhat-4-5-installation
リポジトリ追加
vi /etc/yum.repo.d/squashtest.repo
↓を書き込む
------------
[squashtest]
name=Squashtest
baseurl=http://repo.squashtest.org/redhat/$releasever/
gpgcheck=1
------------
リポジトリキー追加
sudo rpm --import http://repo.squashtest.org/repo.squashtest.org.gpg.key
リポジトリを追加したので念のためアップデート
yum -y update
やっとSquashTMインストール
yum -y install squash-tm
しばらく待ってインストールされたのは、
squash-tm.noarch 0:1.15.1.RELEASE-6.el5
squash-tmのDBを作る
mysql -uroot -p
mysql -u root -p squashtm < /usr/share/doc/squash-tm/database-scripts/mysql-full-install-version-1.15.1.RELEASE.sql
ちょっと時間がかかるので待つこと
ダメだったらphpMyadminにつないでデータベース「squashtm」を選択してSQLにmysql-full-install-version-1.15.1.RELEASE.sqlの中身を流し込む
#どっちみちテーブルとかできるまで時間がかかるので待つ
公式のWikiの手順は↓だけど、
echo "grant select,create temporary tables,insert,delete,update on squashtm.* to 'squash-tm'@'localhost' identified by 'mon_password';" | mysql -u root -p
うまくいかなかったので、↓で実施
grant select,create temporary tables,insert,delete,update on squashtm.* to 'squash-tm'@'localhost' identified by 'mon_password';
#自信はない
設定ファイル変更 データベースをH2からMariaDB(MySQL)へ
vi /etc/sysconfig/squash-tm
--------------
# DataBase parameters
DB_URL="jdbc:h2:///var/lib/squash-tm/data/squash-tm"
DB_TYPE="h2"
DB_USERNAME="sa"
DB_PASSWORD="sa"
これらを↓へ書き換え&追加
DB_URL="jdbc:mysql://localhost/squashtm"
DB_TYPE="com.mysql.jdbc.Driver"
DB_USERNAME="squash-tm"
DB_PASSWORD="mon_password"
DB_DIALECT="org.hibernate.dialect.MySQLDialect"
--------------
squash-tm 起動
/etc/init.d/squash-tm start
自動起動
chkconfig squash-tm on
ファイアウォール設定 Tomcatがつかってる8080を開ける
firewall-cmd --permanent --add-port=8080/tcp
firewall-cmd --reload
firewall-cmd --list-all
http://IPアドレス:8080/squash
へアクセスしてログイン
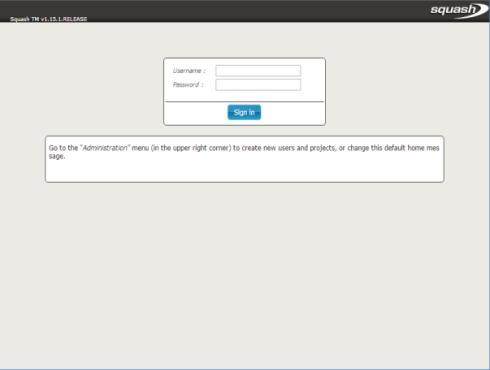
無事使えるようになったー!
とおもったら、このあと問題発生
Hyper-V上のCentos再起動したらsquash-tmが動かんようになってしまったので、
公式のWikiで再度確認
https://sites.google.com/a/henix.fr/wiki-squash-tm/installation-and-exploitation-guide/3---run-and-stop-squash-tm
Run Squash TM with the universal package
1.In the 'bin/' folder, type the command 'startup.bat' (Windows) or 'startup.sh' (Linux/Mac).
2.Open a browser and go to Squash TM using the URL: http://:8080/squash/.
とあるけど、
startup.shがいない
find / -name startup.sh
しても出てこない。。。
何か方法ちょっと考えます。
それと、javaはさっぱりなので、少しでも勉強したほうがいいのだろうか。。。
")
")


http://jasst.jp/symposium/jasst17tokyo/details.html
「テストマネジメントツールSquashTMを利用した継続的テスト改善 」がなかなか良かったらしく、
お試しで使ってみようという話になり入れてみました。
SquashTM
http://www.squashtest.org/fr/decouvrir-squash-tm/contenu-statique/outils-et-fonctionnalites/squash-tm-test-management
提供元が、フランスなのか、フランス語か英語しかない。
困った時のGoogleさん
ChromeでWebページを表示させたらとりあえず翻訳。
Win、Linuxなどいろいろな環境で動くようだけど、ほどよいサーバーがないので、
PCで試してみる。
Win10のHyper-V上にCentos7.0を入れて、Apahce、MariaDB、PHP環境を作るところから。
■やったことのメモ
#念のためこの通りやって動く保証はしません!
SELinux無効
vi /etc/sysconfig/selinux #自分はEMACSは使えない人なので、viで
SELINUX=enforcing
↓
SELINUX=disabled
再起動
shutdown -r now
Apacheもろもろインストール
yum -y install httpd httpd-devel
Apacheスタート・自動起動
systemctl start httpd
systemctl enable httpd
ファイアウォールを通れるようにする
firewall-cmd --permanent --zone=public --add-service=http
firewall-cmd --permanent --zone=public --add-service=https
firewall-cmd --reload
PHPインストール
yum -y install php php-mbstring php-pear
iniファイルを変更して、タイムゾーンとかもろもろ必要ことを書く、コメントアウト外したり
vi /etc/php.ini
-----------------
date.timezone = "Asia/Tokyo"
~中略~
mbsting.language = Japanese
mbstring.internal_encoding = UTF-8
mbstring.http_input = UTF-8
mbstring.http_output = pass
mbstring.encoding_translation = On
mbstring.detect_order = auto
mbstring.substitute_charset = none
-----------------
MariaDBインストール
yum -y install mariadb-server
MariaDB スタート・自動起動
service mariadb start
systemctl enable mariadb
MariaDBの設定その1
vi /etc/my.cnf
-----------------
[mysqld]
datadir=/var/lib/mysql
socket=/var/lib/mysql/mysql.sock
# Disabling symbolic-links is recommended to prevent assorted security risks
symbolic-links=0
# Settings user and group are ignored when systemd is used.
# If you need to run mysqld under a different user or group, # customize your systemd unit file for mariadb according to the # instructions in http://fedoraproject.org/wiki/Systemd
character-set-server=utf8 ←追加
[mysqld_safe]
log-error=/var/log/mariadb/mariadb.log
pid-file=/var/run/mariadb/mariadb.pid
#
# include all files from the config directory # !includedir /etc/my.cnf.d
[mysql] ←追加
default-character-set=utf8 ←追加
-----------------
MariaDBの設定その2
mysql -u root -p
MariaDB [(none)]> use mysql;
rootのパスワード設定
MariaDB [mysql]> update user set password=password('任意のぱすーわど') where user = 'root';
MariaDB [mysql]> delete from user where user = '';
MariaDB [mysql]> exit;
phpMyAdmin インストール
yum --enablerepo=epel -y install phpMyAdmin php-mysql php-mcrypt
phpMyAdmin にリモートから接続できようにする
※セキュリティが気になる人はやらないように
vi /etc/httpd/conf.d/phpMyAdmin.conf
---------------------
Directory /usr/share/phpMyAdmin/
と
Directory /usr/share/phpMyAdmin/setup/
Apache 2.4のところコメントアウトと追加
# Require ip 127.0.0.1
# Require ip ::1
Require all granted ←追加
---------------------
ここまでが下準備
ここからやっと
SquashTMのインストール
インストール手順はここ↓参照
https://sites.google.com/a/henix.fr/wiki-squash-tm/installation-and-exploitation-guide/2---installation-of-squash-tm/3---redhat-4-5-installation
リポジトリ追加
vi /etc/yum.repo.d/squashtest.repo
↓を書き込む
------------
[squashtest]
name=Squashtest
baseurl=http://repo.squashtest.org/redhat/$releasever/
gpgcheck=1
------------
リポジトリキー追加
sudo rpm --import http://repo.squashtest.org/repo.squashtest.org.gpg.key
リポジトリを追加したので念のためアップデート
yum -y update
やっとSquashTMインストール
yum -y install squash-tm
しばらく待ってインストールされたのは、
squash-tm.noarch 0:1.15.1.RELEASE-6.el5
squash-tmのDBを作る
mysql -uroot -p
mysql -u root -p squashtm < /usr/share/doc/squash-tm/database-scripts/mysql-full-install-version-1.15.1.RELEASE.sql
ちょっと時間がかかるので待つこと
ダメだったらphpMyadminにつないでデータベース「squashtm」を選択してSQLにmysql-full-install-version-1.15.1.RELEASE.sqlの中身を流し込む
#どっちみちテーブルとかできるまで時間がかかるので待つ
公式のWikiの手順は↓だけど、
echo "grant select,create temporary tables,insert,delete,update on squashtm.* to 'squash-tm'@'localhost' identified by 'mon_password';" | mysql -u root -p
うまくいかなかったので、↓で実施
grant select,create temporary tables,insert,delete,update on squashtm.* to 'squash-tm'@'localhost' identified by 'mon_password';
#自信はない
設定ファイル変更 データベースをH2からMariaDB(MySQL)へ
vi /etc/sysconfig/squash-tm
--------------
# DataBase parameters
DB_URL="jdbc:h2:///var/lib/squash-tm/data/squash-tm"
DB_TYPE="h2"
DB_USERNAME="sa"
DB_PASSWORD="sa"
これらを↓へ書き換え&追加
DB_URL="jdbc:mysql://localhost/squashtm"
DB_TYPE="com.mysql.jdbc.Driver"
DB_USERNAME="squash-tm"
DB_PASSWORD="mon_password"
DB_DIALECT="org.hibernate.dialect.MySQLDialect"
--------------
squash-tm 起動
/etc/init.d/squash-tm start
自動起動
chkconfig squash-tm on
ファイアウォール設定 Tomcatがつかってる8080を開ける
firewall-cmd --permanent --add-port=8080/tcp
firewall-cmd --reload
firewall-cmd --list-all
http://IPアドレス:8080/squash
へアクセスしてログイン

無事使えるようになったー!
とおもったら、このあと問題発生
Hyper-V上のCentos再起動したらsquash-tmが動かんようになってしまったので、
公式のWikiで再度確認
https://sites.google.com/a/henix.fr/wiki-squash-tm/installation-and-exploitation-guide/3---run-and-stop-squash-tm
Run Squash TM with the universal package
1.In the 'bin/' folder, type the command 'startup.bat' (Windows) or 'startup.sh' (Linux/Mac).
2.Open a browser and go to Squash TM using the URL: http://:8080/squash/.
とあるけど、
startup.shがいない
find / -name startup.sh
しても出てこない。。。
何か方法ちょっと考えます。
それと、javaはさっぱりなので、少しでも勉強したほうがいいのだろうか。。。
- 作者: 高橋 麻奈
- 出版社/メーカー: SBクリエイティブ
- 発売日: 2016/08/31
- メディア: 単行本
スッキリわかる サーブレット&JSP入門 (スッキリシリーズ)
- 作者: 国本 大悟
- 出版社/メーカー: インプレス
- 発売日: 2014/05/07
- メディア: 単行本(ソフトカバー)
- 作者: 藤野 圭一
- 出版社/メーカー: オライリージャパン
- 発売日: 2014/12/26
- メディア: 大型本
じゅぴたー さん

-
nice! 11896
記事 4268
テーマ パソコン・インターネット
プロフィール
ブログを紹介する
【ソフマップ】

【Dell】

【ソニーストア】


【McAfee】


コメント 0