きままな日常、思いつき、毒舌、言いたい放題・・・PCネタ、ガンダムネタが楽しいです。
Centos7.0 KVMによる仮想マシン環境構築 [コンピュータ]
PCネタを連投。
Centos7.0でKVMによる仮想マシン環境構築します。
インストールは終わっていて、ネットワークやらなんらやの設定は終わっているのが前提
仮想マシンは、NATじゃなくて仮想ブリッジ経由で外部と通信をします。
--------------------
■yum リポジトリサーバをrikenへ変更 これやっておかないと、updateできない
vi /etc/yum.repos.d/CentOS-Base.repo
mirrorlistをコメントアウト、
baseurl=http://ftp.riken.jp/Linux/centos/$releasever/os/$basearch/ を追加
[root@localhost etc]# cat /etc/yum.repos.d/CentOS-Base.repo
# CentOS-Base.repo
#
# The mirror system uses the connecting IP address of the client and the
# update status of each mirror to pick mirrors that are updated to and
# geographically close to the client. You should use this for CentOS updates
# unless you are manually picking other mirrors.
#
# If the mirrorlist= does not work for you, as a fall back you can try the
# remarked out baseurl= line instead.
#
#
[base]
name=CentOS-$releasever - Base
#mirrorlist=http://mirrorlist.centos.org/?release=$releasever&arch=$basearch&repo=os&infra=$infra
#baseurl=http://mirror.centos.org/centos/$releasever/os/$basearch/
baseurl=http://ftp.riken.jp/Linux/centos/$releasever/os/$basearch/
gpgcheck=1
gpgkey=file:///etc/pki/rpm-gpg/RPM-GPG-KEY-CentOS-7
#released updates
[updates]
name=CentOS-$releasever - Updates
#mirrorlist=http://mirrorlist.centos.org/?release=$releasever&arch=$basearch&repo=updates&infra=$infra
#baseurl=http://mirror.centos.org/centos/$releasever/updates/$basearch/
baseurl=http://ftp.riken.jp/Linux/centos/$releasever/os/$basearch/
gpgcheck=1
gpgkey=file:///etc/pki/rpm-gpg/RPM-GPG-KEY-CentOS-7
#additional packages that may be useful
[extras]
name=CentOS-$releasever - Extras
#mirrorlist=http://mirrorlist.centos.org/?release=$releasever&arch=$basearch&repo=extras&infra=$infra
#baseurl=http://mirror.centos.org/centos/$releasever/extras/$basearch/
baseurl=http://ftp.riken.jp/Linux/centos/$releasever/os/$basearch/
gpgcheck=1
gpgkey=file:///etc/pki/rpm-gpg/RPM-GPG-KEY-CentOS-7
#additional packages that extend functionality of existing packages
[centosplus]
name=CentOS-$releasever - Plus
#mirrorlist=http://mirrorlist.centos.org/?release=$releasever&arch=$basearch&repo=centosplus&infra=$infra
#baseurl=http://mirror.centos.org/centos/$releasever/centosplus/$basearch/
baseurl=http://ftp.riken.jp/Linux/centos/$releasever/os/$basearch/
gpgcheck=1
enabled=0
gpgkey=file:///etc/pki/rpm-gpg/RPM-GPG-KEY-CentOS-7
-----------------
■デバイス確認
[root@localhost ~]# nmcli device
デバイス タイプ 状態 接続
enp14s0 ethernet 接続済み enp14s0
lo loopback 管理無し --
#必ずしも、「enp14s0」ではない環境によって読み替え必要
-----------------
■KVM使用可否確認
[root@localhost ~]# grep -E 'svm|vmx' /proc/cpuinfo > /dev/null && echo OK
OK ← OKと表示されれば完全仮想化対応CPU
[root@localhost ~]# grep flags /proc/cpuinfo|grep lm > /dev/null && echo OK
OK ← OKと表示されれば64ビットCPU
-----------------
■仮想化関連パッケージインストール
[root@localhost ~]# yum -y groupinstall "Virtualization Host"
[root@localhost ~]#yum -y install qemu-kvm libvirt virt-install bridge-utils
オフラインゲスト編集ツールインストール
[root@localhost ~]# yum -y install '*guestf*'
-----------------
■仮想マシン制御起動
[root@localhost ~]# systemctl start libvirtd ←起動
[root@localhost ~]# systemctl enable libvirtd ←自動起動
-----------------
■ホストマシンのシャットダウン時にKVMゲストを自動でシャットダウンする
[root@localhost ~]# vi /etc/sysconfig/libvirt-guests
# URIs to check for running guests
# example: URIS='default xen:/// vbox+tcp://host/system lxc:///'
#URIS=default
# action taken on host boot
# - start all guests which were running on shutdown are started on boot
# regardless on their autostart settings
# - ignore libvirt-guests init script won't start any guest on boot, however,
# guests marked as autostart will still be automatically started by
# libvirtd
#ON_BOOT=start
# Number of seconds to wait between each guest start. Set to 0 to allow
# parallel startup.
#START_DELAY=0
# action taken on host shutdown
# - suspend all running guests are suspended using virsh managedsave
# - shutdown all running guests are asked to shutdown. Please be careful with
# this settings since there is no way to distinguish between a
# guest which is stuck or ignores shutdown requests and a guest
# which just needs a long time to shutdown. When setting
# ON_SHUTDOWN=shutdown, you must also set SHUTDOWN_TIMEOUT to a
# value suitable for your guests.
#ON_SHUTDOWN=suspend
ON_SHUTDOWN=shutdown ←コメントアウトを外して変更
# If set to non-zero, shutdown will suspend guests concurrently. Number of
# guests on shutdown at any time will not exceed number set in this variable.
#PARALLEL_SHUTDOWN=0
PARALLEL_SHUTDOWN=4 ←コメントアウトを外して変更
# Number of seconds we're willing to wait for a guest to shut down. If parallel
# shutdown is enabled, this timeout applies as a timeout for shutting down all
# guests on a single URI defined in the variable URIS. If this is 0, then there
# is no time out (use with caution, as guests might not respond to a shutdown
# request). The default value is 300 seconds (5 minutes).
#SHUTDOWN_TIMEOUT=300
SHUTDOWN_TIMEOUT=300 ←コメントアウトを外して変更
# If non-zero, try to bypass the file system cache when saving and
# restoring guests, even though this may give slower operation for
# some file systems.
#BYPASS_CACHE=0
-----------------
■仮想ブリッジ作成と設定 ※IPアドレスとインターフェイスは読み替える
br0 を新規作成
[root@localhost ~]# nmcli connection add type bridge autoconnect yes con-name br0 ifname br0
br0 のスパニングツリー設定を無効化
# nmcli connection modify br0 bridge.stp no
「br0」の IPアドレス設定
[root@localhost ~]# nmcli connection modify br0 ipv4.addresses 192.168.1.x/24 ipv4.method manual
「br0」の ゲートウェイ設定
[root@localhost ~]# nmcli connection modify br0 ipv4.gateway 192.168.1.x
「br0」の DNS 設定
[root@localhost ~]# nmcli connection modify br0 ipv4.dns 192.168.1.x
※ここからはリモート接続していると切れるので実機上でやること
# 既存のインターフェースは一旦削除 「enp14s0」は読み替え
[root@localhost ~]# nmcli connection delete enp14s0
# 「br0」のメンバーとして再度追加
[root@localhost ~]# nmcli connection add type bridge-slave autoconnect yes con-name enp14s0 ifname enp14s0 master br0
# NetworkManager 停止 & 起動で設定を有効にする
[root@localhost ~]# systemctl stop NetworkManager; systemctl start NetworkManager
念のため再起動
[root@localhost ~]# shutdown -r now
-----------------
■ゲストOSのインストール
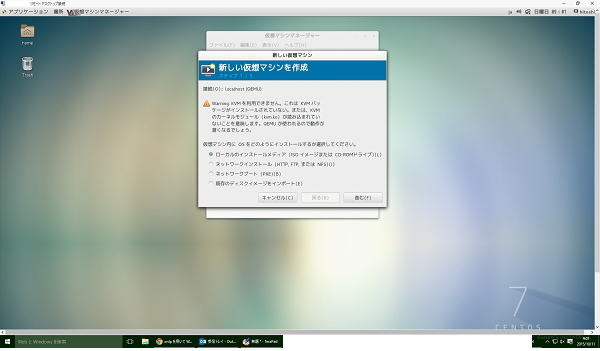
GUI で仮想マシンの作成するため仮想マシンマネージャーをインストール
[root@localhost ~]# yum -y install virt-manager
ここから先はGUIの作業
Windowsからリモートデスクトップ接続して作業します
-----------------
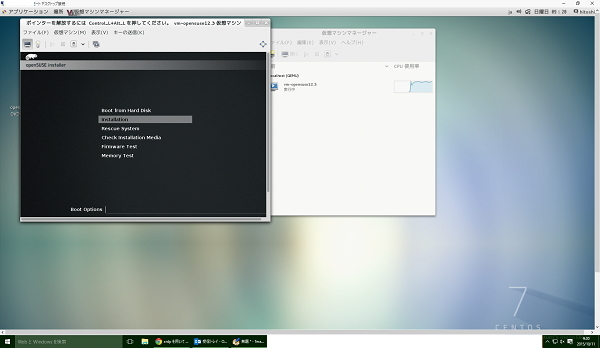
仮想マシンマネージャーを起動して、ゲストを作成

CPUのコア数、HDDサイズ、メモリ容量などを割り当て、ISOイメージから起動。
DVDブートと同じ起動画面がくるので、通常と同じように設定してあげれば、ゲストOSのインストールは完了です。
いろいろなweサイトを参考にさせていただきました
https://centossrv.com/kvm.shtml
http://www.server-world.info/query?os=CentOS_7&p=kvm
http://www.torutk.com/projects/swe/wiki/Linux_KVM%E3%83%9B%E3%82%B9%E3%83%88%E3%81%AE%E3%83%8D%E3%83%83%E3%83%88%E3%83%AF%E3%83%BC%E3%82%AF%E8%A8%AD%E5%AE%9A-CentOS_7
http://spacekey.info/blog/archives/853
http://www.torutk.com/projects/swe/wiki/Linux_KVM%E6%93%8D%E4%BD%9C
http://orange.servecounterstrike.com/html/tomokaku_archives/2015/05/kvmguest-create.html
http://e-garakuta.net/techinfo/doku.php/linux/kvm
Centos7.0でKVMによる仮想マシン環境構築します。
インストールは終わっていて、ネットワークやらなんらやの設定は終わっているのが前提
仮想マシンは、NATじゃなくて仮想ブリッジ経由で外部と通信をします。
--------------------
■yum リポジトリサーバをrikenへ変更 これやっておかないと、updateできない
vi /etc/yum.repos.d/CentOS-Base.repo
mirrorlistをコメントアウト、
baseurl=http://ftp.riken.jp/Linux/centos/$releasever/os/$basearch/ を追加
[root@localhost etc]# cat /etc/yum.repos.d/CentOS-Base.repo
# CentOS-Base.repo
#
# The mirror system uses the connecting IP address of the client and the
# update status of each mirror to pick mirrors that are updated to and
# geographically close to the client. You should use this for CentOS updates
# unless you are manually picking other mirrors.
#
# If the mirrorlist= does not work for you, as a fall back you can try the
# remarked out baseurl= line instead.
#
#
[base]
name=CentOS-$releasever - Base
#mirrorlist=http://mirrorlist.centos.org/?release=$releasever&arch=$basearch&repo=os&infra=$infra
#baseurl=http://mirror.centos.org/centos/$releasever/os/$basearch/
baseurl=http://ftp.riken.jp/Linux/centos/$releasever/os/$basearch/
gpgcheck=1
gpgkey=file:///etc/pki/rpm-gpg/RPM-GPG-KEY-CentOS-7
#released updates
[updates]
name=CentOS-$releasever - Updates
#mirrorlist=http://mirrorlist.centos.org/?release=$releasever&arch=$basearch&repo=updates&infra=$infra
#baseurl=http://mirror.centos.org/centos/$releasever/updates/$basearch/
baseurl=http://ftp.riken.jp/Linux/centos/$releasever/os/$basearch/
gpgcheck=1
gpgkey=file:///etc/pki/rpm-gpg/RPM-GPG-KEY-CentOS-7
#additional packages that may be useful
[extras]
name=CentOS-$releasever - Extras
#mirrorlist=http://mirrorlist.centos.org/?release=$releasever&arch=$basearch&repo=extras&infra=$infra
#baseurl=http://mirror.centos.org/centos/$releasever/extras/$basearch/
baseurl=http://ftp.riken.jp/Linux/centos/$releasever/os/$basearch/
gpgcheck=1
gpgkey=file:///etc/pki/rpm-gpg/RPM-GPG-KEY-CentOS-7
#additional packages that extend functionality of existing packages
[centosplus]
name=CentOS-$releasever - Plus
#mirrorlist=http://mirrorlist.centos.org/?release=$releasever&arch=$basearch&repo=centosplus&infra=$infra
#baseurl=http://mirror.centos.org/centos/$releasever/centosplus/$basearch/
baseurl=http://ftp.riken.jp/Linux/centos/$releasever/os/$basearch/
gpgcheck=1
enabled=0
gpgkey=file:///etc/pki/rpm-gpg/RPM-GPG-KEY-CentOS-7
-----------------
■デバイス確認
[root@localhost ~]# nmcli device
デバイス タイプ 状態 接続
enp14s0 ethernet 接続済み enp14s0
lo loopback 管理無し --
#必ずしも、「enp14s0」ではない環境によって読み替え必要
-----------------
■KVM使用可否確認
[root@localhost ~]# grep -E 'svm|vmx' /proc/cpuinfo > /dev/null && echo OK
OK ← OKと表示されれば完全仮想化対応CPU
[root@localhost ~]# grep flags /proc/cpuinfo|grep lm > /dev/null && echo OK
OK ← OKと表示されれば64ビットCPU
-----------------
■仮想化関連パッケージインストール
[root@localhost ~]# yum -y groupinstall "Virtualization Host"
[root@localhost ~]#yum -y install qemu-kvm libvirt virt-install bridge-utils
オフラインゲスト編集ツールインストール
[root@localhost ~]# yum -y install '*guestf*'
-----------------
■仮想マシン制御起動
[root@localhost ~]# systemctl start libvirtd ←起動
[root@localhost ~]# systemctl enable libvirtd ←自動起動
-----------------
■ホストマシンのシャットダウン時にKVMゲストを自動でシャットダウンする
[root@localhost ~]# vi /etc/sysconfig/libvirt-guests
# URIs to check for running guests
# example: URIS='default xen:/// vbox+tcp://host/system lxc:///'
#URIS=default
# action taken on host boot
# - start all guests which were running on shutdown are started on boot
# regardless on their autostart settings
# - ignore libvirt-guests init script won't start any guest on boot, however,
# guests marked as autostart will still be automatically started by
# libvirtd
#ON_BOOT=start
# Number of seconds to wait between each guest start. Set to 0 to allow
# parallel startup.
#START_DELAY=0
# action taken on host shutdown
# - suspend all running guests are suspended using virsh managedsave
# - shutdown all running guests are asked to shutdown. Please be careful with
# this settings since there is no way to distinguish between a
# guest which is stuck or ignores shutdown requests and a guest
# which just needs a long time to shutdown. When setting
# ON_SHUTDOWN=shutdown, you must also set SHUTDOWN_TIMEOUT to a
# value suitable for your guests.
#ON_SHUTDOWN=suspend
ON_SHUTDOWN=shutdown ←コメントアウトを外して変更
# If set to non-zero, shutdown will suspend guests concurrently. Number of
# guests on shutdown at any time will not exceed number set in this variable.
#PARALLEL_SHUTDOWN=0
PARALLEL_SHUTDOWN=4 ←コメントアウトを外して変更
# Number of seconds we're willing to wait for a guest to shut down. If parallel
# shutdown is enabled, this timeout applies as a timeout for shutting down all
# guests on a single URI defined in the variable URIS. If this is 0, then there
# is no time out (use with caution, as guests might not respond to a shutdown
# request). The default value is 300 seconds (5 minutes).
#SHUTDOWN_TIMEOUT=300
SHUTDOWN_TIMEOUT=300 ←コメントアウトを外して変更
# If non-zero, try to bypass the file system cache when saving and
# restoring guests, even though this may give slower operation for
# some file systems.
#BYPASS_CACHE=0
-----------------
■仮想ブリッジ作成と設定 ※IPアドレスとインターフェイスは読み替える
br0 を新規作成
[root@localhost ~]# nmcli connection add type bridge autoconnect yes con-name br0 ifname br0
br0 のスパニングツリー設定を無効化
# nmcli connection modify br0 bridge.stp no
「br0」の IPアドレス設定
[root@localhost ~]# nmcli connection modify br0 ipv4.addresses 192.168.1.x/24 ipv4.method manual
「br0」の ゲートウェイ設定
[root@localhost ~]# nmcli connection modify br0 ipv4.gateway 192.168.1.x
「br0」の DNS 設定
[root@localhost ~]# nmcli connection modify br0 ipv4.dns 192.168.1.x
※ここからはリモート接続していると切れるので実機上でやること
# 既存のインターフェースは一旦削除 「enp14s0」は読み替え
[root@localhost ~]# nmcli connection delete enp14s0
# 「br0」のメンバーとして再度追加
[root@localhost ~]# nmcli connection add type bridge-slave autoconnect yes con-name enp14s0 ifname enp14s0 master br0
# NetworkManager 停止 & 起動で設定を有効にする
[root@localhost ~]# systemctl stop NetworkManager; systemctl start NetworkManager
念のため再起動
[root@localhost ~]# shutdown -r now
-----------------
■ゲストOSのインストール
GUI で仮想マシンの作成するため仮想マシンマネージャーをインストール
[root@localhost ~]# yum -y install virt-manager
ここから先はGUIの作業
Windowsからリモートデスクトップ接続して作業します
-----------------
仮想マシンマネージャーを起動して、ゲストを作成
CPUのコア数、HDDサイズ、メモリ容量などを割り当て、ISOイメージから起動。
DVDブートと同じ起動画面がくるので、通常と同じように設定してあげれば、ゲストOSのインストールは完了です。

いろいろなweサイトを参考にさせていただきました
https://centossrv.com/kvm.shtml
http://www.server-world.info/query?os=CentOS_7&p=kvm
http://www.torutk.com/projects/swe/wiki/Linux_KVM%E3%83%9B%E3%82%B9%E3%83%88%E3%81%AE%E3%83%8D%E3%83%83%E3%83%88%E3%83%AF%E3%83%BC%E3%82%AF%E8%A8%AD%E5%AE%9A-CentOS_7
http://spacekey.info/blog/archives/853
http://www.torutk.com/projects/swe/wiki/Linux_KVM%E6%93%8D%E4%BD%9C
http://orange.servecounterstrike.com/html/tomokaku_archives/2015/05/kvmguest-create.html
http://e-garakuta.net/techinfo/doku.php/linux/kvm
じゅぴたー さん

-
nice! 11896
記事 4268
テーマ パソコン・インターネット
プロフィール
ブログを紹介する
【ソフマップ】

【Dell】

【ソニーストア】


【McAfee】


コメント 0